
9 Patch Parade: Thrice As Much Fun – Week 1
The second month of the 9 Patch Parade kicks off today and it’s gearing up to be amazing. Are you ready to have fun with secondary patterns created by 9 patch blocks?
I have designed a quilt, “Thrice As Much Fun” [CLICK HERE TO PURCHASE], that will help you unlock the possibilities for secondary designs when working with the 9 Patch block. Over the coming 4 weeks I’m going to walk you through making “Thrice As Much Fun” as part of the 9 Patch Parade.
Task for the Week: Pick your fabrics!

Understanding the Pattern
To achieve the look on the cover of “Thrice As Much Fun” you will need 6 distinct fabrics/colours. You’ll find the fabric requirements, as well as a placement diagram, on the back of the pattern.
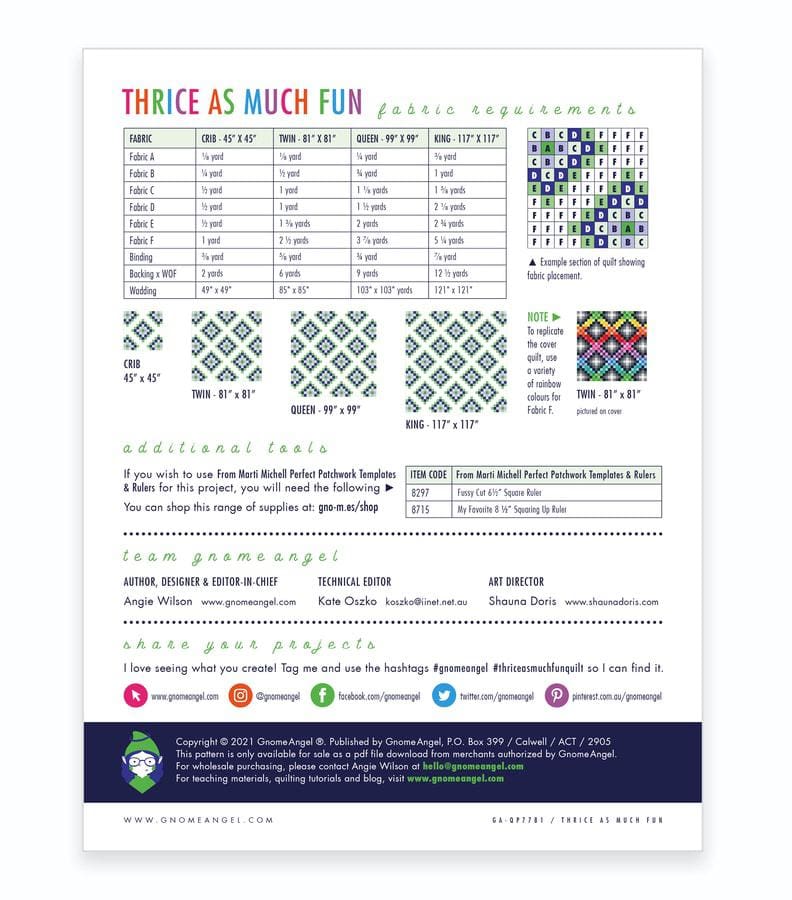
If you want to be successful with highlighting the two secondary patterns in the quilt top, the diamond and the Triple Irish Chain, then you need to ensure you pick bold and distinct fabrics for each section.
Fabric F is a scrappy selection of different fabrics from the same colour family. (See below for examples.)
Fabric E needs to have enough of a tonal difference between it and Fabric F so that it stands out. If the fabric is too close in tone to Fabric F they will bleed together and you won’t get a crisp line to the diamond.
I think the best way to get a feel for your options with this pattern is to see what others have done with it, so let’s take a stroll together through a gallery of wonderful tester quilts.
Fabric Selections in the Wild
To help you work out the look you’re going to go for I’m sharing with you some of the versions of “Thrice As Much Fun” that my wonderfully talented and adventurous testers made.
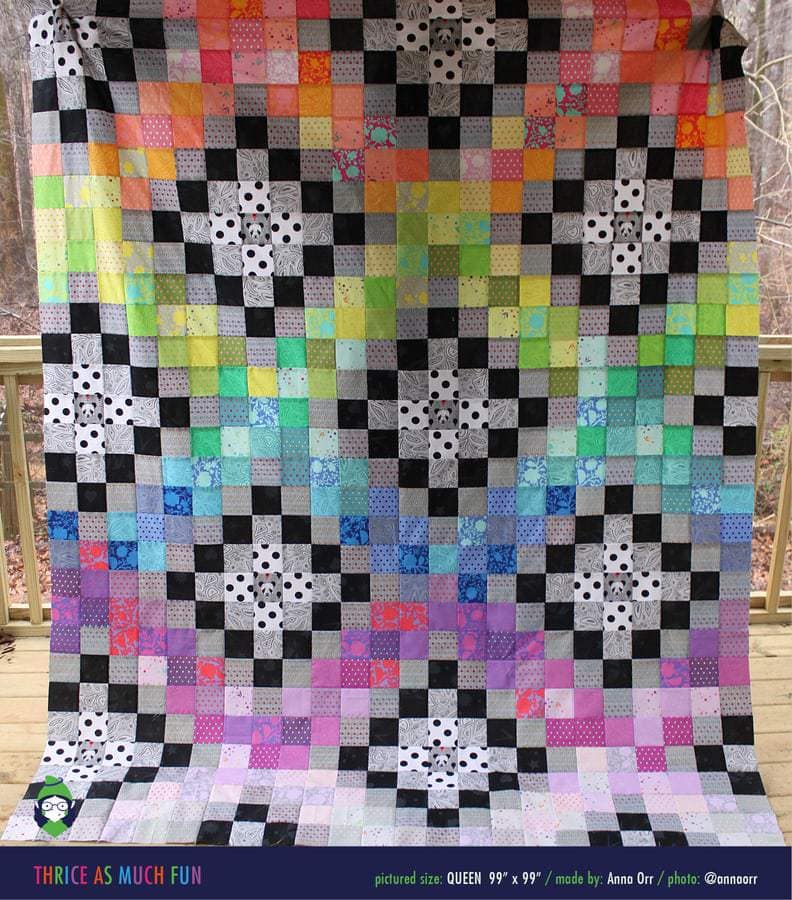
rainbow
The fabulous Anna Orr (Click here to follow her on Instagram) made this Tula Pink Linework [CLICK HERE TO PURCHASE] and True Colours version and it’s all the rainbow goodness I could hope for. To achieve this look you’ll need to go monochromatic with the following fabrics in the pattern: Fabric A, Fabric B, Fabric C, Fabric D and Fabric E.
Anna used the colouring sheet that comes free with the pattern to plan out her rainbow progression. (The pattern includes an example of how to achieve the rainbow look. It also includes a colouring sheet to help you plan.)
Anna’s rainbow makes a smooth progression between the colours because she included one or two pieces in the next band of colour to blend them together. It’s a wonderful use of colour and fussy cutting. Those panda’s from Tula Pink’s Linework [CLICK HERE TO PURCHASE] sit so nicely in the centre of each of Anna’s diamonds.
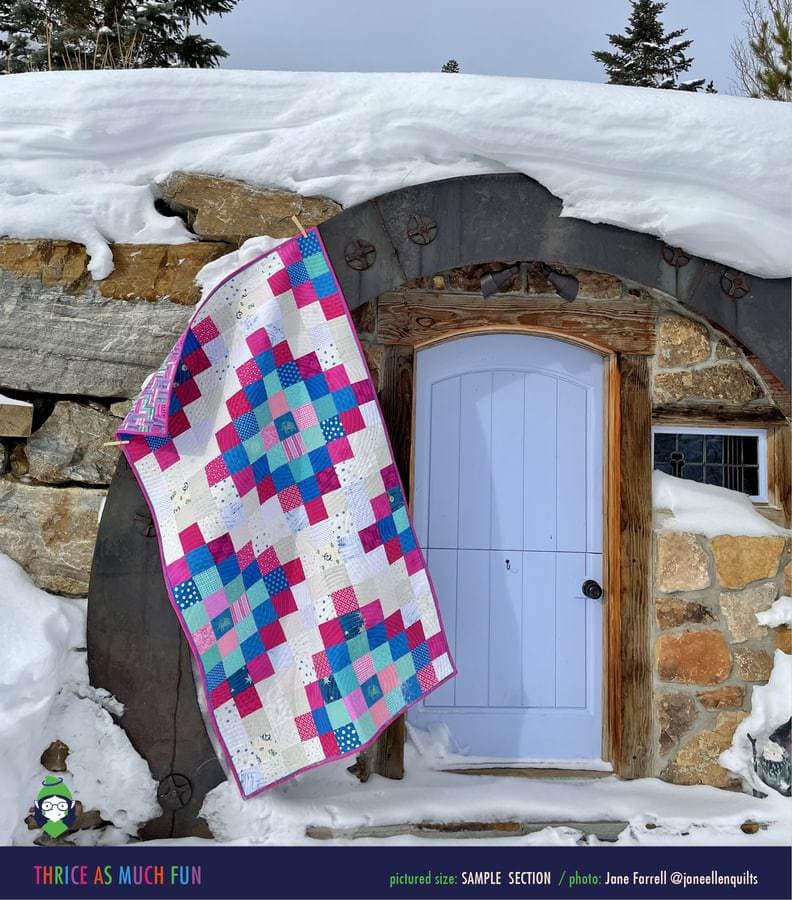
Low Volume Background
This amazing quilt was made by Jane Farrell (click here to follow her on Instagram) and it’s exactly what I had in mind when I designed the background of this quilt. It’s all low volume prints mixed in together and I’m obsessed with it.
Using a low volume background has meant that Jane’s choice of boldly saturated colours for her diamonds just pop. Jane’s gone scrappy with her fabrics. By keeping each in the same colour family and tonal value for her pieces Jane has achieved a consistent background. For example, Piece E is all pink, Piece D is all dark blue, Piece C is all aqua, Piece B is light pink and Piece A (the centre) is that sweet fussy cut elephant.
I also love that Jane has highlighted the flow of the fabrics with her quilting. The spiral quilting centred on each diamond gives movement and texture to this quilt that just begs you to touch it. The binding is another stroke of genius as Jane has used a piped binding to get a small pop of blue in against the magenta of her main binding.
If the quilt isn’t amazing enough Jane snuck out on a cold morning to get this sun drenched photo of her beautiful quilt hanging on the little hobbit inspired cubby house that her late husband made on their property for their grandchildren. I love everything about this. Everything!
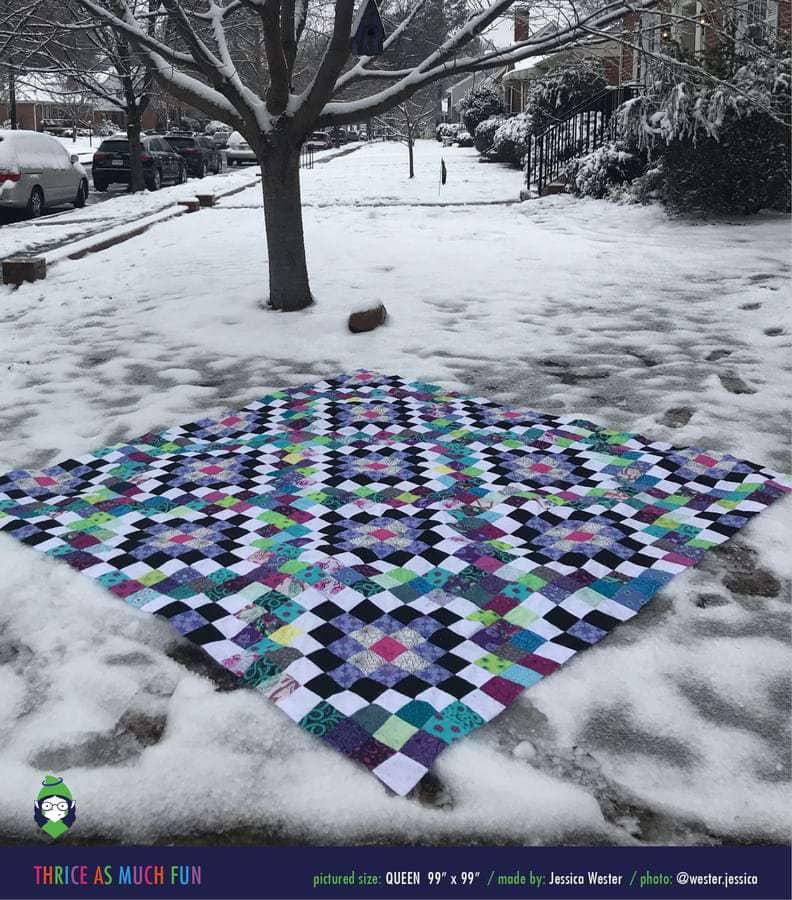
Controlled Chaos
Jessica Wester (click her to follow her on Instagram) used the combination of white and black to make order from the madness of diving into her scrap collection for the background in this quilt. Jessica picked her colours from her inspiration fabric, Tula Pink’s De La Luna.
The use of white as her Fabric F means that the eye has somewhere to rest and the diamonds float on the scrappy background. This is a great example to show that you really can go banana’s with your scraps and walk away with a fabulous quilt. You just need to make sure that you make a clean break between your Fabric F and Fabric E. If in doubt, white is always a good go-to as it delivers the absence of colour.
I’m going to be stalking Jessica’s Instagram feed this month hanging out for when she shares images of this quilt from a front on perspective. Seeing the quilt from the front will allow you to appreciate the full genius of her fabric placement.
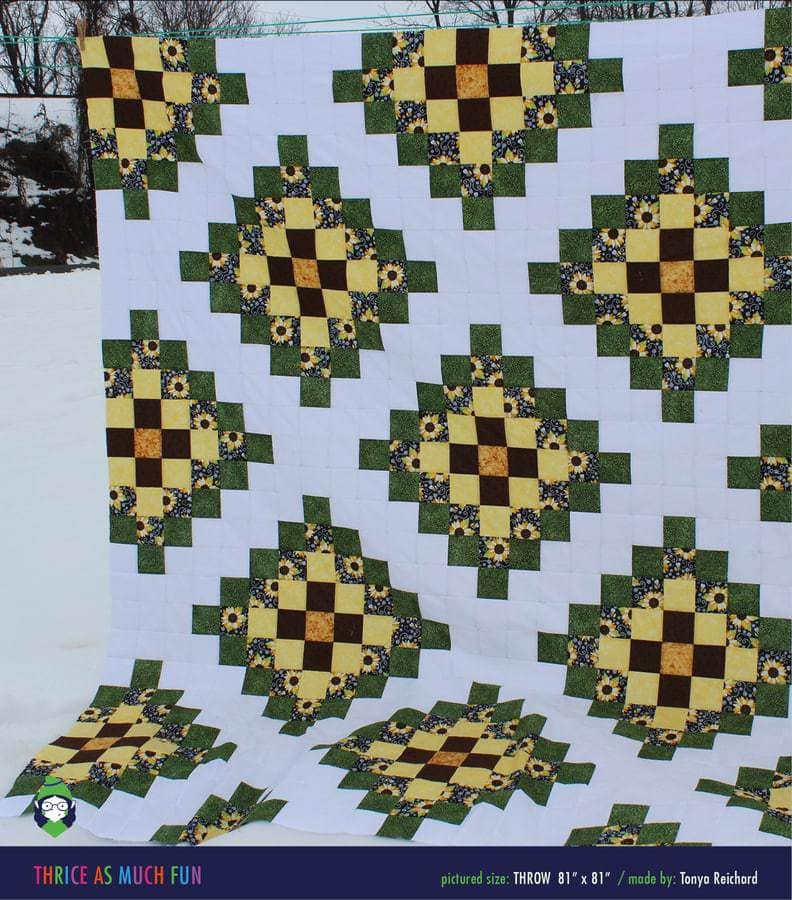
Single Fabric Background
By using a single white fabric for her background Tonya Reichard has made her beautiful flowers (diamonds) pop. If this is the approach you’d like to take you’ll need to do the following:
- Use a solid fabric or tone-on-tone fabric,
- Replace all the Block D’s in the pattern with 9.5″ x 9.5″ squares of your background fabric. By doing this you will not need to cut the Piece F’s needed for these blocks.
- You will need Piece F for the other blocks. Use the assembly diagrams in the pattern to work out how many Piece F to cut.
This approach will mean a more economical use of your time and fabric if you replace Block D with a single piece of fabric.
However, if you’d like the same look, but with a patterned fabric, I recommend cutting and piecing the Piece F fabric for Block D because you’ll get a consistent look to your background. The cutting and piecing will help blend in Block D with the rest of the background. If you cut the squares for Block D you’ll have big clumps of uninterrupted fabric pattern in your background. This may detract from the quilt design.
I love how Tonya has mixed prints with solids to create these bold diamonds. I love the the sunflower print reflects the sunflower-like impact that Tonya’s achieved through fabric placement. It’s a flower garden for your bed!
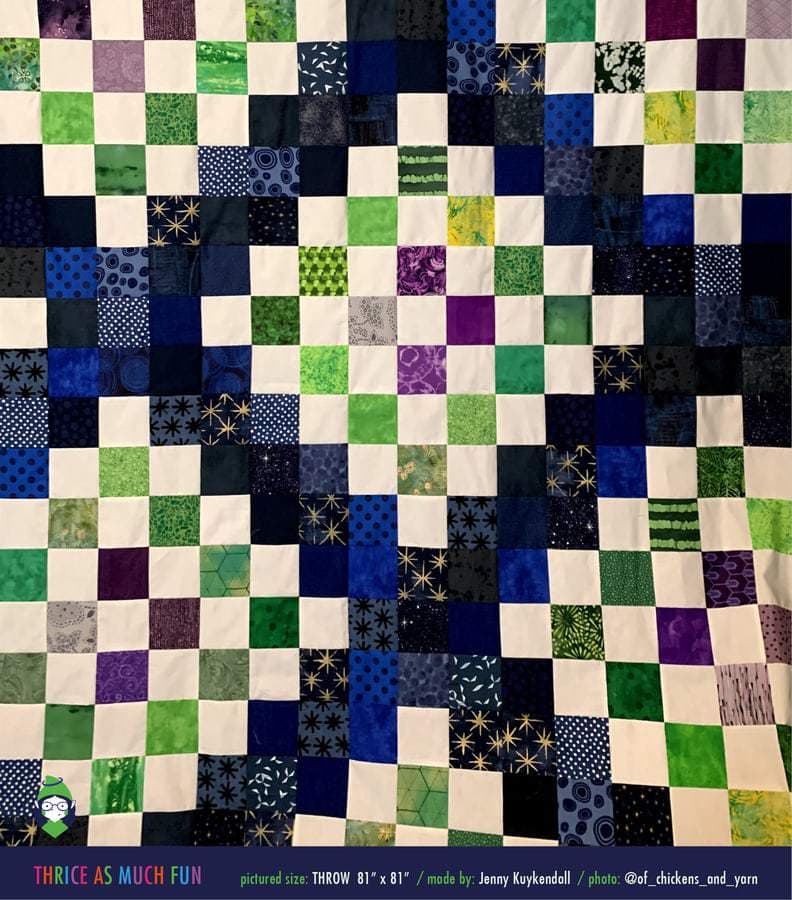
Limited Colour Palette
Jenny Kuykendall (click here to follow her on Instagram) made this version with a limited colour palette and lots of scraps. The background of this quilt is like a night’s sky. It’s stunning! Jenny’s use of 3 colours (navy, green and purple) with white is a great example of how using a limited colour palette can highlight different areas in the secondary design.
It’s amazing how the use of white in the diamonds makes the eye see other things in the pattern. Use the free colouring sheet that comes with the pattern and have a play with colour and fabric placement. By planning your quilt before you start you’ll have endless opportunities to create secondary designs and have fun with the 9 Patch block.
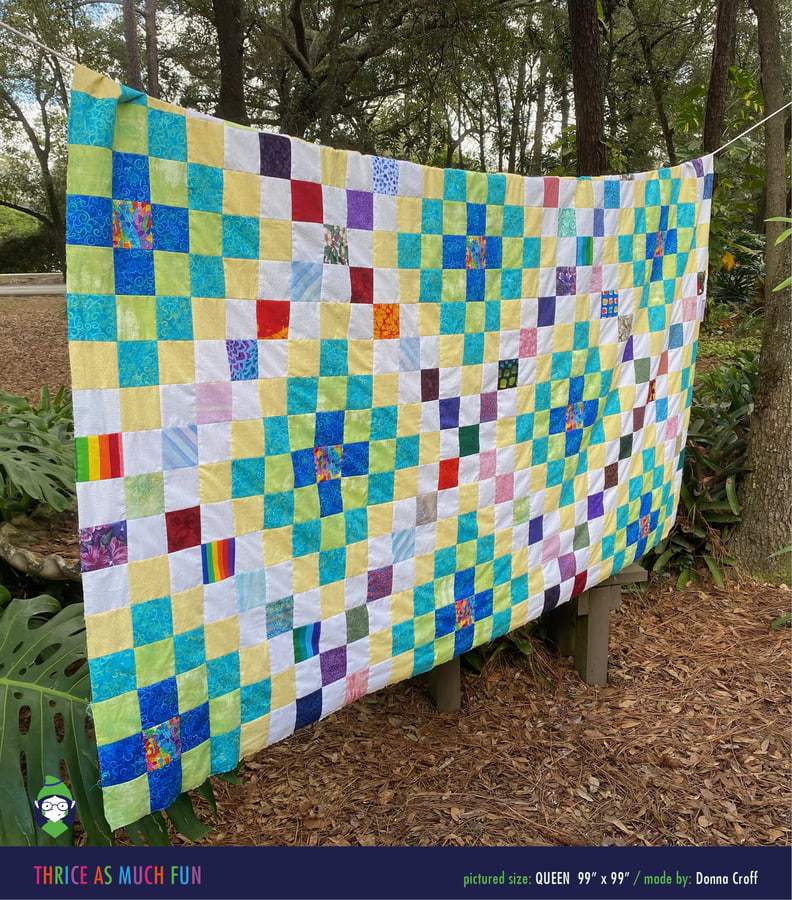
Triple Irish Chain
Donna Croff did something that I had hoped someone would. Donna made the Irish Chain (click here to read about the history of the Irish Chain) pop in her version. The use of white does two things; it frames the scrappy chain pattern and it doesn’t compete with the diamonds. Donna has achieved a great a balancing act!
This is such a great example of how diving into your stash can be like a walk down memory lane. I love that there’s such a mix of prints and colours in this quilt top. I take a special enjoyment from the fact that the centre of each diamond is a fabulous piece of rainbow fabric.
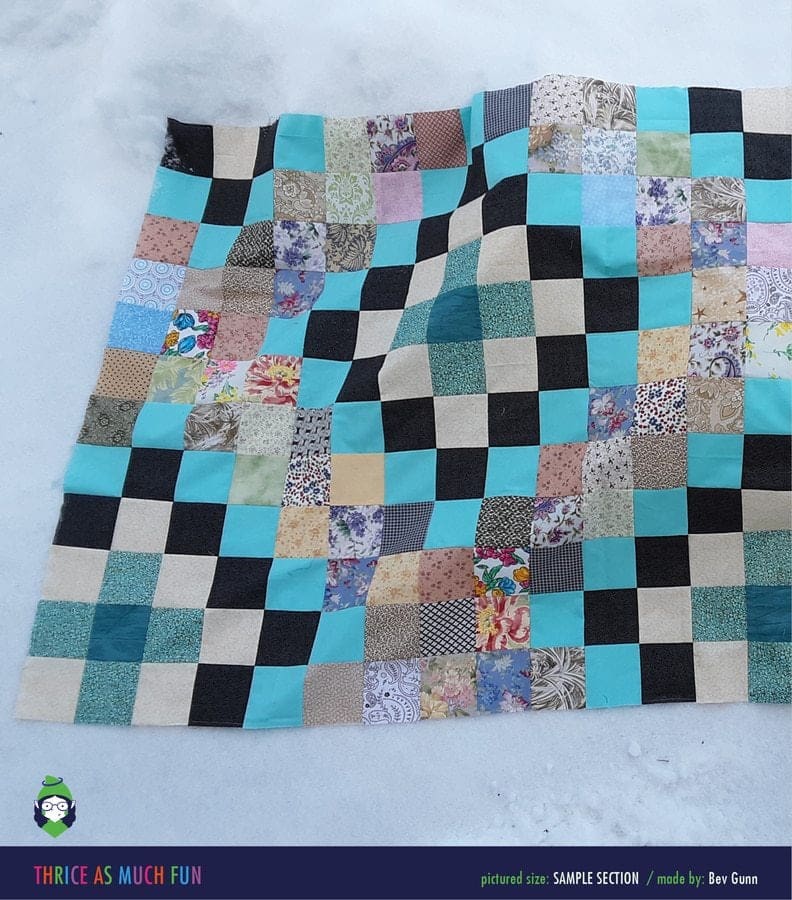
Bold Pop of Colour
Bev Gunn’s version just made me smile. It reminds me of one of the very first quilts I ever made (click here to see it). The use of the crisp clear blue against the black and the lighter fabrics in the background was inspired. The blue just pops and gives this quilt a modern feel to what is a very traditional inspired pattern.
Bev’s version is another great example of how scrap diving can bring so much enjoyment. By picking just one place to be uniform and consistent, whether in fabric or colour choice, you will be able to have endless fun with the secondary designs.
Where to from here?
Hopefully these quilts have inspired you to have fun. Remember to use the free colouring sheet in the pattern to help you shop your stash. I’m off to raid my stash! I can’t wait to see what fun I can have with this pattern. I’m looking forward to spending this month with you twirling our batons through the 9 Patch Parade route!
this month’s deadlines
You can use the following dates and prompts to help plan your month and stay on track.
- Week 1: 1 – 7 March – Fabric Selection
- Week 2: 8 – 14 March – Cutting and Preparation
- Week 3: 15 – 21 March – Sewing
- Week 4: 22 – 31 March – Show & Tell Completed Projects
The next section of the 9 Patch Parade will kick off 5 April. The patterns will be “Diamonds on the Inside” by GnomeAngel or “Mock Diagonal Nine Patch” by Marti Michell. When you purchase the 9 Patch Starter Kit both patterns are included and you can [CLICK HERE TO PURCHASE].
Connect with the 9 Patch Community
If you would like to share your makes or ask questions or even make new friends you can do so in two places: Home of the Gnome(Angel) on Facebook [CLICK HERE TO JOIN] and on Instagram via the #FMM9PatchParade hashtag [CLICK HERE TO CHECK IT OUT].


