
A Year With Miss Lizzy: Block 4 – Lily of the Valley
A Year with Miss Lizzy moves on to Block 4: Lily of the Valley. I love the visual impact of this block, it’s like interlacing petals. It can be a little tricky with fabric placement if you’re not paying attention to what you’re doing (as I’ll demonstrate below), so I recommend if you can lay your pieces out as you work. This block also demonstrates the advantages of using the From Marti Michell Perfect Patchwork Templates.
The tutorial below should help you put together your block without incident. The eagle eyed amongst you may see that on the seam pressing photo I’ve used 2 different type of seams (open and to the side). This is because I used 2 different construction methods for the half square triangles. It’s not a big deal and as always I advise you to press to your personal preference.

A Word About My Approach
As you’ll see in the pattern I like to work in units. Each block is made up of simple and repeated unit types such as a half square triangle (HST). When I work in pieced patchwork I like to break the block down into it’s units and make these first and then assemble the block.
I do this because it allows me to batch process (a term borrowed from computing that just means to repeat the same action) the cutting, sewing and pressing. Another way to think of it is like chain piecing. You’re repeating the same actions multiple times to cut down on effort and save time. (I’m all about time saving!)
This approach is reflected in how I write my patterns. I’ll show you how to make the units contained within each block and then we’ll do the block construction.
Supplies
You’ll need the following to complete this block:
- Block Pattern
- Sewing Machine
- Basic Sewing Supplies – I use and recommend Wonderfil Konfetti 50wt 906
- Iron and Ironing Board
- Rotary Cutter and Cutting Mat
- Removable fabric marker
- Ruler
- Seam Ripper
- Optional: From Marti Michell Perfect Patchwork Template Set A (For Miss Lizzy’s Garden)
- Optional: From Marti Michell Multi-Size Half Square Triangle Ruler (For Miss Lizzy’s Blooms)
- Optional: From Marti Michell 6.5″ Squaring Up Ruler (For Miss Lizzy’s Blooms)
A Note on Pressing
Pressing is like deciding which sporting team to follow – we all have our own opinions and in the end it really doesn’t matter which one you follow as long as you’re having fun.
To help you out though I’ll provide a photograph of the back of my block so you can see how I’ve pressed. I’m sharing this with you now so that you can keep this in mind as you work through your block assembly.
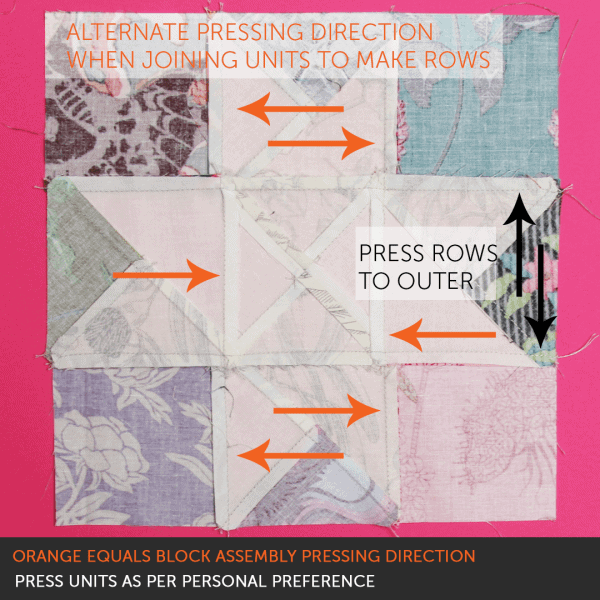
Over the course of this year you’ll notice that my pressing direction changes depending on the situation. Sometimes I’ll press open to help the block lay flat, some times I’ll press to one side to help nest my seams for greater accuracy and sometimes I’ll press to the lazy.
Further down in the tutorial I’ll show you how I pin to help all the seams play nicely together. Pinning is a little like pressing – it’s up to you how you do it. I like to pin a lot, whereas other like to hold together with their fingers. For me, my sewing style requires the extra support that pins provide. Do what works best for you – this is a judgement free zone!
Block Unit Construction
While I use, recommend and couldn’t live without the From Marti Michell Perfect Patchwork Templates and Rulers I know that not everyone has these in their collections so the pattern and tutorials will show you how to make your blocks using either the “Traditional” Method or “From Marti Michell” Method.
The Traditional Method will require the standard patchwork supplies everyone should have (rotary cutter and ruler), whereas the From Marti Michell Method will show you how to use the templates and rulers to construct the block. Use the method that corresponds to your working style, your budget and what helps you be most accurate.
Traditional Half Square Triangle Assembly
The following method allows you to make two at a time half square triangles. I like to make mine a little bigger and then trim to size as I find this helps if you seams aren’t as accurate as they need to be. It does mean that there is a sliver of fabric waste. If you’re finding that ever with the fudge factor (trimming) your blocks are not coming out to size make sure you’re sewing with an scant quarter inch seam.

Please note: You will need 3 fabric combinations of HSTs for this block, they are:
- Piece A + Piece B
- Piece E + Piece F
- Piece G + Piece H
Please refer to the block assembly diagram on page 3 to work out which fabrics go where.
Traditional Half Quarter Square Triangle Assembly
This assembly is a continuation from the assembly you started with the Half Square Triangle blocks. You will need the HSTs made from the following combinations for this step:
- Piece E + Piece F
- Piece G + Piece H

At the end of this step you will have half quarter triangle squares with the following piece combinations:
- Piece D + Piece F + Piece E
- Piece C + Piece G + Piece H
Please note: This method of construction will result in surplus units being created. Please consult the block assembly diagram to use the correct one and add the spare into your scrap blocks bucket for later use in another project.
Traditional Quarter Square Triangle Assembly
This assembly is a continuation from the assembly you started with the Half Square Triangle blocks. You will need the HSTs made from the following combinations for this step:
- Piece A + Piece B

FMM Half Quarter Square Triangle Assembly
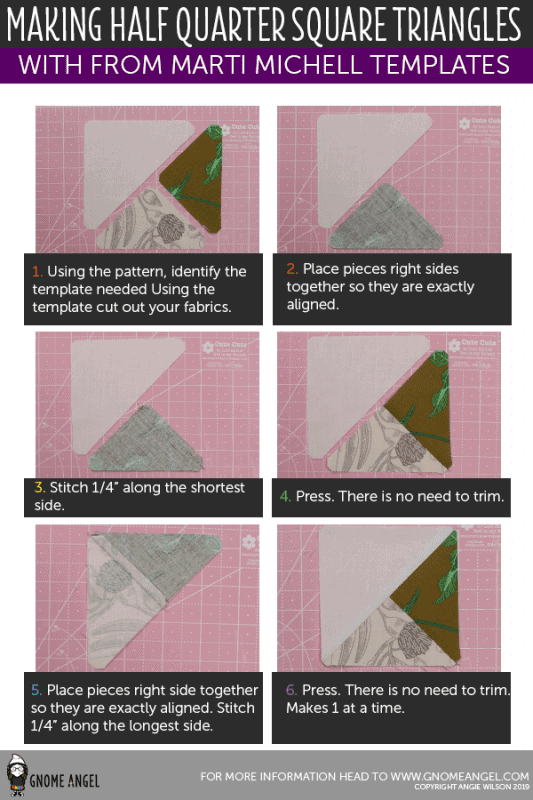
This is where the From Marti Michell Perfect Patchwork Templates and rulers come in to their own. Not only do you not create excess units you can use them to ensure your directional prints run in the right direction and that you only cut what you need to use. There is no need to make HSTs with this method of construction.
To make these units you will need the following combination:
- Piece D + Piece E + Piece F
- Piece C + Piece G + Piece H
FMM Quarter Square Triangle Assembly
This is where the From Marti Michell Perfect Patchwork Templates and rulers come in to their own. Not only do you not create excess units you can use them to ensure your directional prints run in the right direction and that you only cut what you need to use. There is no need to make HSTs with this method of construction.
To make these units you will need the following combination:
- Piece A + Piece B

Block Construction
This is the fun bit – seeing all your hard work come together in a block you’ll love.
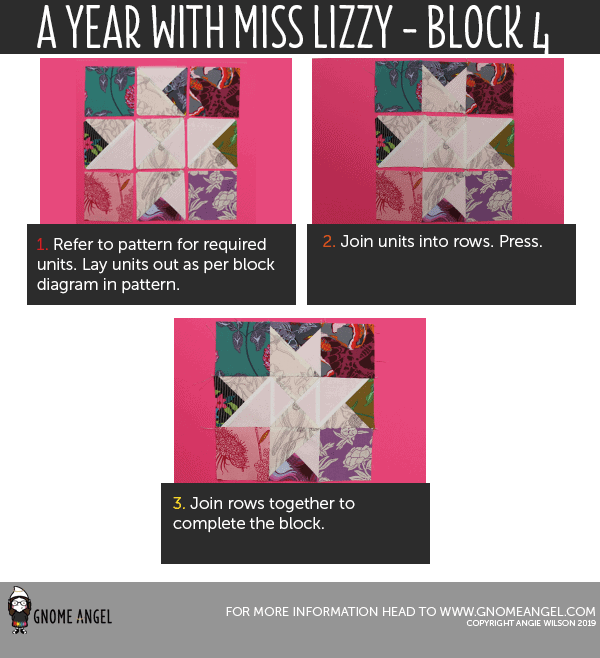
If you need more assistance with how to pin the rows to join them please see my previous block tutorials.
My Versions of this Block
I’m addicted to making patchwork blocks and so it should come as no surprise that I have 4 versions of A Year with Miss Lizzy on the go at the moment:
- An all Lizzy House version in the Miss Lizzy’s Garden layout.
- A Tula Pink print from Zuma and solids version in the Miss Lizzy’s Blooms layout.
- A version using Alexander Henry’s “zocalo” fabric and solids which will be a bonus layout for those that are working from both Miss Lizzy’s Garden and Miss Lizzy’s Blooms patterns. (You can buy both patterns for a discounted price by clicking here.)
- A version using Anna Maria Horner fabrics in a modified version of Miss Lizzy’s Garden for those looking to make a version with only 16 9″ blocks, instead of the 48 in the provided layout.
A Word on Fabric Selection
There is no right or wrong when it comes to fabric selection. It’s all about what fabrics, colours and prints make YOU happy. However, I know that it can be a thing that strikes fear into a quilter’s heart so each month you’ll get a colouring sheet with that month’s block on it (four of them so you can really play) that will help you decide what to use.


