
Thanks a Bunch Marti Michell Mini Quilt

“Thanks a Bunch” is my Marti Michell Mini Quilt that I’m sharing how to make as part of the Marti Michell Mini Quiltmania. I’ve made this mini using Anna Maria Horner prints teamed with Robert Kaufman Kona Cottons. I’m really thrilled with how it has turned out. I have loved this block pattern from a far for awhile now and put off doing it because I thought it would have to be foundation paper pieced. However you can make this block (in a number of sizes) using From Marti Michell Perfect Patchwork Templates. This version I’m sharing with you has been made using From Marti Michell Perfect Patchwork Templates Set B and From Marti Michell Perfect Patchwork Templates Set D. The other added bonus, I found the instruction for making this block in Marti Michell’s The Perfect Patchwork System Encyclopaedia of Patchwork Blocks Volume 2 (page 34 – 35). Marti has kindly allowed me to share this tutorial with you all so you can make your own beautiful version.
I fussy cut the Anna Maria Horner fabrics to give the illusion of bunches of flowers and I love how it turned out. I cut all the blocks at the same time and then chain pieced it and it went together really quickly. It’s quilted in a very simple gird pattern using Aurifil Light Lilac #2510 which disappears nicely into the background but adds texture and interest on closer inspection. I love the “square” that’s formed by having all the blocks point inwards.
This mini can be made in a day and makes a great thank you present, or even a present for Mother’s Day. If mini’s aren’t you thing you could easily turn it into a cushion. Or make more of the blocks and turn it into a table runner. (Imagine it with the blocks alternated in a long line. Devine!) But enough daydreaming, let’s get down to the making!
Thanks A Bunch Mini Quilt
Finished size: 20″ x 20″
A note on this tutorial: This tutorial assumes an intermediate level of sewing and quilting knowledge. It’s assumed you will understand how to apply sashing, borders, layer, quilt and bind your mini.
Materials
- From Marti Michell Perfect Patchwork Templates Set B
- From Marti Michell Perfect Patchwork Templates Set D
- Focal Prints: 4 x Fat Quarters
- Coordinating Solids: 4 x Fat Quarters
- “Stem” Fabric: 1 x Fat Quarter
- Background: Half Yard
- Binding: 4.5″ x Width of Fabric
- Backing Fabric: 23″ x 23″
- Batting: 23″ x 23″
- General sewing and quilting supplies.
Cutting Instructions
From Each Focal Print
- 3 x From Marti Michell Perfect Patchwork Template B12
- 6 x From Marti Michell Perfect Patchwork TemplateB13
From Each Coordinating Solid
- 6 x From Marti Michell Perfect Patchwork TemplateB14
- 3 squares 1.5″ x 1.5″
- From Stem Fabric
- 4 x From Marti Michell Perfect Patchwork Template D24
Background
- 6 x From Marti Michell Perfect Patchwork TemplateB14
- 3 rectangles 1.5″ x 2.5″
- 3 squares 1.5″ x 1.5″
- 4 x From Marti Michell Perfect Patchwork Template D23
- 4 x From Marti Michell Perfect Patchwork Template D23 Reversed (Flip template over so printing is facing right side of fabric)
- 2 rectangles 1.5″ x 8.5″
- 3 rectangle 1.5″ x 17.5″
- 2 rectangles 1.5″ x 20″
Binding
- 2 strips 2.25″ x Width of Fabric
Construction
Read all instructions before starting. All seams are 1/4″. Press either open or to the side. Press between each step.
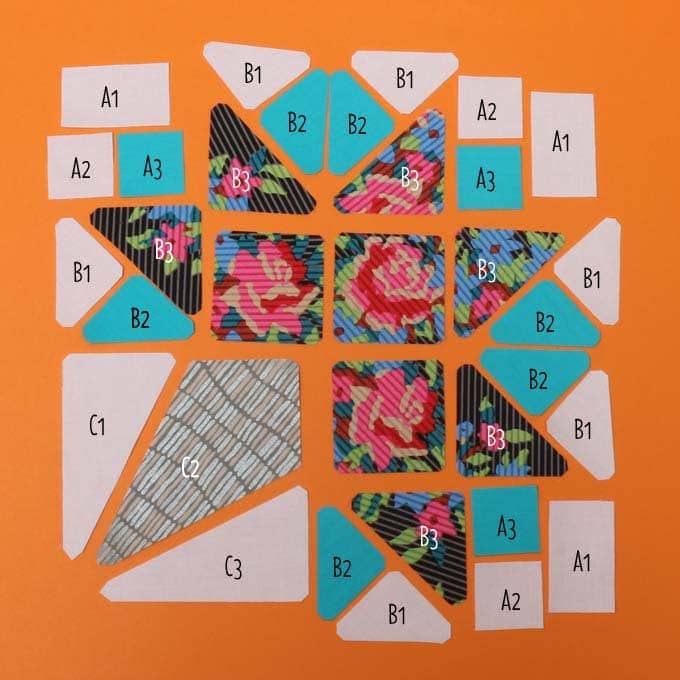
1. Cut out pieces and lay out each block as per the above diagram.
2. Making the 3 corner squares:
- Join A2 to A3
- Join A2 + A3 to A1
This is unit A.
3. Making the 6 quarter square triangle units:
- Join B1 to B2
- Join B1 + B2 to B3
This is unit B
4. Making the stem unit:
- Join C1 to C2
- Join C3 to C2 + C1
This is unit C

5. Making the 3 Quarters:
- Join Unit A to Unit B
- Join Unit B to D1
Repeat for each quarter as per layout.

6. Making the halves:
- Join the top two square to make a row
- Join the bottom two squares to make a row
7. Join to halves to complete the block. Make 4 blocks in total.
8. Layout blocks as per finished mini quilt. Add sashing:
- Join Block 1 to rectangle 1.5″ x 8.5″
- Join Block 2 to Block 1 and rectangle to make row 1
- Repeat for Block 3 and 4 to make row 2
- Join row 1 to rectangle 1.5″ x 17.5″
9. Add borders to each side of the completed blocks and sashing.
Finishing
Layer, bind and quilt as desired.
Get More Marti Michell Mini Quilts
I hope you love making your own mini as much as I love making mine! Don’t forget to check out the other Marti Michell Mini Quilts that are being mades using From Marti Michell Perfect Patchwork Templates Sets A, B, D, N and S.
12/08/2016 Angie @ GnomeAngel.com
19/08/2016 Tonya @ The Crafty Mummy
26/08/2016 Lucy @ Charm About You
02/09/2016 Kirsty @ Bonjour Quilts
09/09/2016 Cat @ Cat + Vee
16/09/2016 Nathalie @ Les Ouvrages de Nat
23/09/2016 Alyce @ Blossom Heart Quilts
30/09/2016 Peta @ She Quilts A Lot
07/10/2016 Lisa @ Sweet Little Pretties
14/10/2016 Rachel @ Wooden Spoon Quilts
21/10/2016 Raylee @ Sunflower Quilting
28/10/2016 Lisa @ In The Boon Docks
04/11/2016 And the lady herself, Marti Michell
Disclosure: This post contains affiliate links. If you purchase those items through my links I will earn a very small commission. You will not pay more when buying a product through my link, in fact in some cases I can offer you a better price via an affiliate link. I will not recommend something that I do not use myself. These commissions help me keep being able to provide you with great content for free. Thank you, in advance for your support!


I love how angular this is, and yet softened by the way you used the florals. Such a perfect balance and so personal too 🙂
Cute and beautiful little mini!
Ooh I love, love, love the way you handled the AMH fabric … fabulous!
Brilliant, Angie! Such a mod looking traditional block. I’m a fan of AMH too, so that was always going to mean I’d love this. I’m really looking forward to seeing all the minis in the tour.
I really love your design! I love the bouquets/posy shape…I love the fabrics you chose…and I love the colors. This is something I need to make for myself. Thank you for sharing!
Gorgeous! Love the fussy cutting effect for the flowers! Makes me want to run to the studio to make one!