How to Make the Patchwork Block: Air Castle
I’m so excited to show you how to make the patchwork block “Air Castle” and introduce you to the fun of patchwork with templates. “Air Castle” has such movement and provides some great opportunities for fussy cutting. I’ve got 5 different versions of this block included in the tutorial to spark your imagination and show you what can be possible. I know you’ll put your own spin on it and I can’t wait to see your block(s). Remember to share it in the Facebook Group or on Instagram using the hashtag #FreeBlockFriday.

Block information
Block Number + Name: 01 – Air Castle
Quilt Pattern: Jumping Jacks Sampler for Free Block Friday. Enter your details below to get your copy of the pattern.
[convertkit form=2713416]
Construction Method: From Marti Michell Perfect Patchwork Templates and Rulers
From Marti Michell Perfect Patchwork Templates Used:
I’ve put together bundles of the templates and rulers I used for this project and you can find them in my online shop.


Make Your Own Templates
If you’d prefer to make your own templates the pattern comes with free printables of the templates so that you can make your own. To help you with making your own templates I’ve done a tutorial showing you one way to make them.
Before You Sew
- I pressed to my own preference; a mixture of open and to one side. I’ve provided a photograph of the back of the block so you can see how I did it.
- I used a Schmetz 70/10 needle.
- I used Wonderfil Konfetti Cotton 50wt in Pale Grey (KT906) thread for piecing.
- I used the From Marti Michell Perfect Patchwork Template Set B
- I used Flatter by Soak in Yuzu 248ml as my starch.
- I used a design board to layout my pieces while I worked. Click here for a tutorial on how to make your own.
If you’d like to know “My Top 10 Beginners Patchworking Tools” you can find them by clicking here.
Measurements for the pieces needed to construct this block will not be provided in this tutorial. It is a prerequisite of making this block that you have a copy of the pattern. Measurements can be found in this pattern.
Choose Your Fabrics
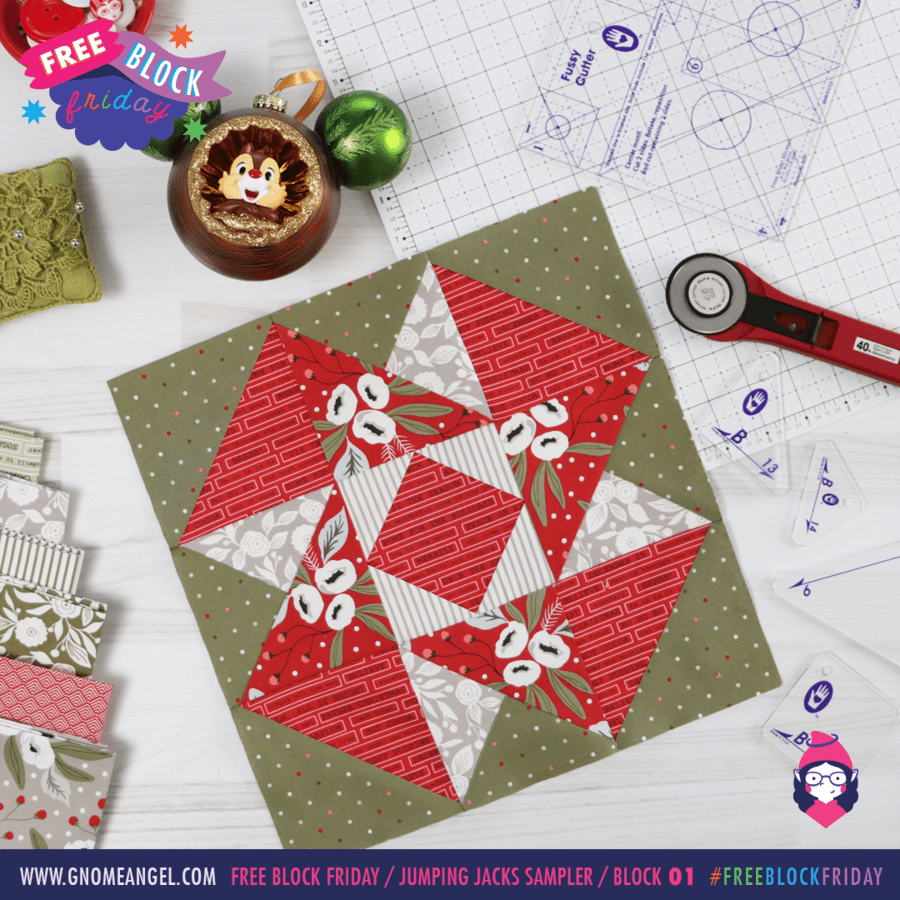
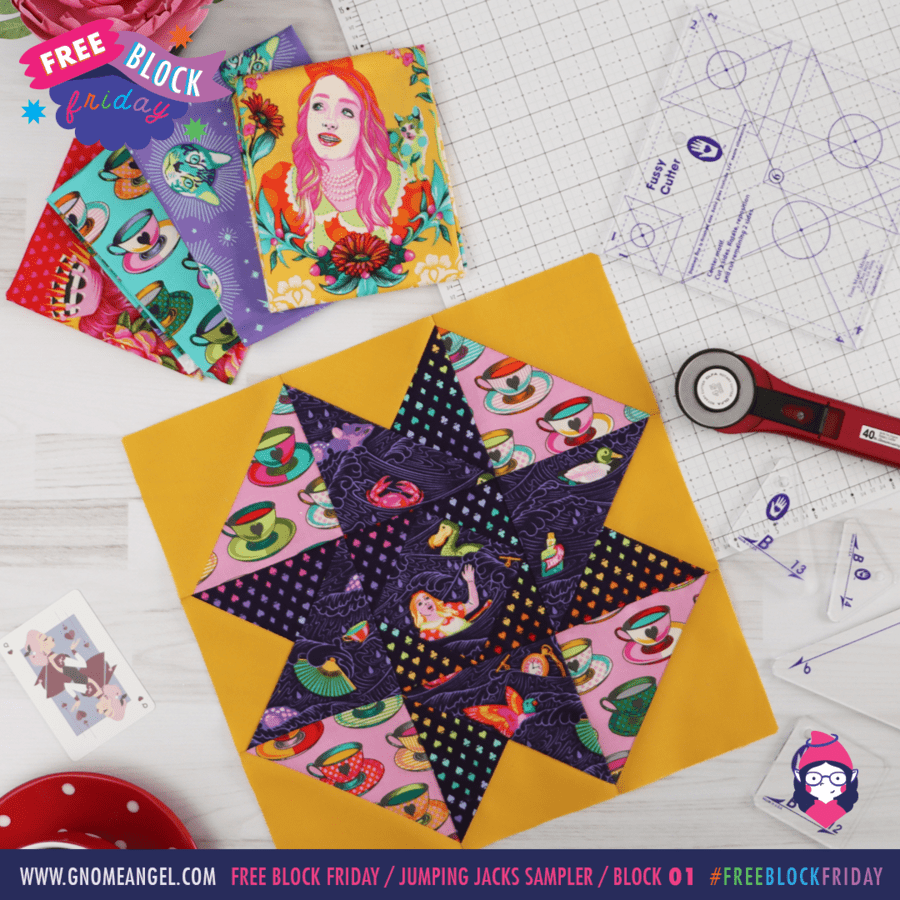
I provide 2 colouring options for the Jumping Jacks Sampler: Bubblegum and Rainbow Spectrum. This tutorial shows the bubblegum version. If you’d like to make a version with the exact fabrics that I have used they are:
I’ve also made 4 (yep four!) other versions of this sampler that I’ll reveal as we work our way through it. You too can make these versions simply click the buttons below to purchase the fabric bundles I used.


Plan Your Quilt with PreQuilt.com
I’ve collaborated with the wonderful team at PreQuilt.com to provide you with free colouring sheets for the Jumping Jacks Sampler. You can plan your quilt blocks based on the fabric placements I have used in my blocks.
How to Make the Block
General Advice:
- Tolerance Levels: you need to decide what is an acceptable tolerance level for “mistakes”. For example if your blocks are consistently 12¼” instead of 12.5″ are you ok with this? Or if your seams matching are less than an 1/8″ “off” are you ok with this. There’s no hard or fast rule and it’s different for everyone, so remember it’s your quilt so make your decision for you.
- Press your seams at each step. Click here for a great article on how to press your seams for patchwork.
- You can iron and starch your fabric prior to cutting. I also starch when pressing bulky seams. If you can afford it, a wool pressing mat does wonders to help flatten seams.
- When pinning, pin away from you so that you don’t move your pieces when pinning.
- Where possible I chain piece all the pieces I can in one step. If you’re unsure of what chain piecing is, click here for a tutorial on how to do it.
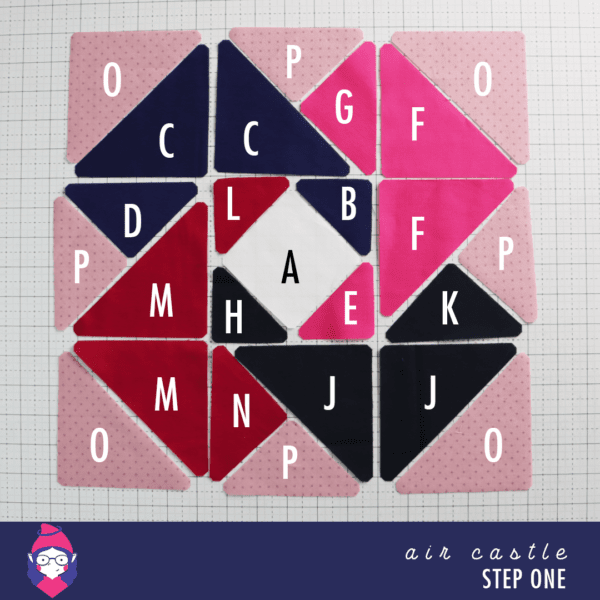
The photos below show you the step progression of making this block. Please read the accompanying text before starting to make your block.
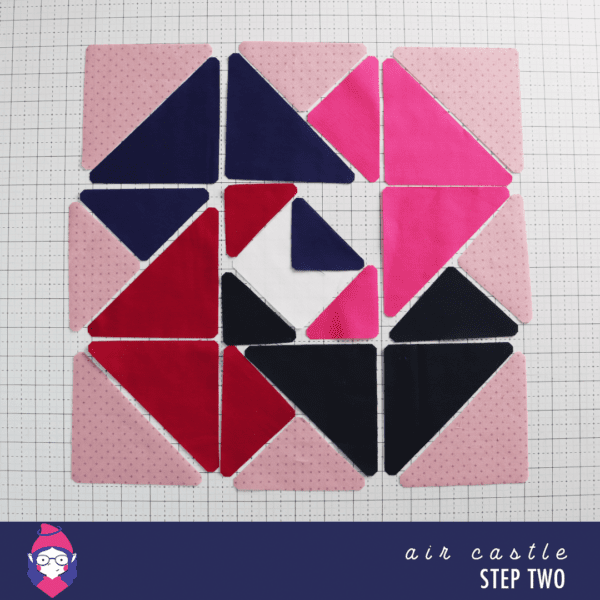
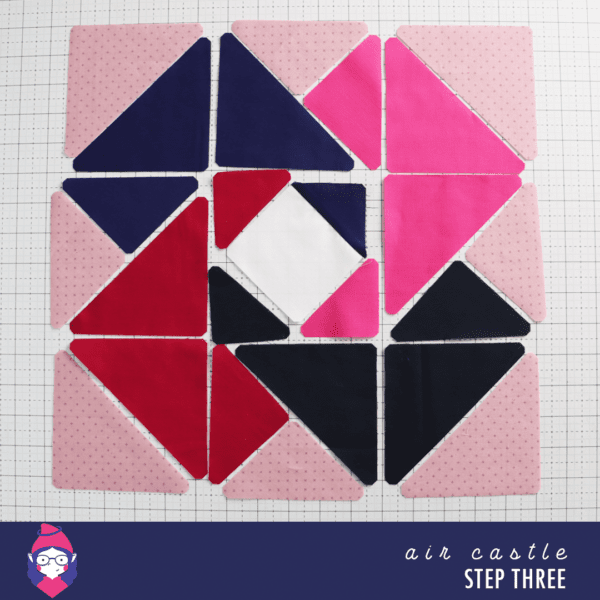
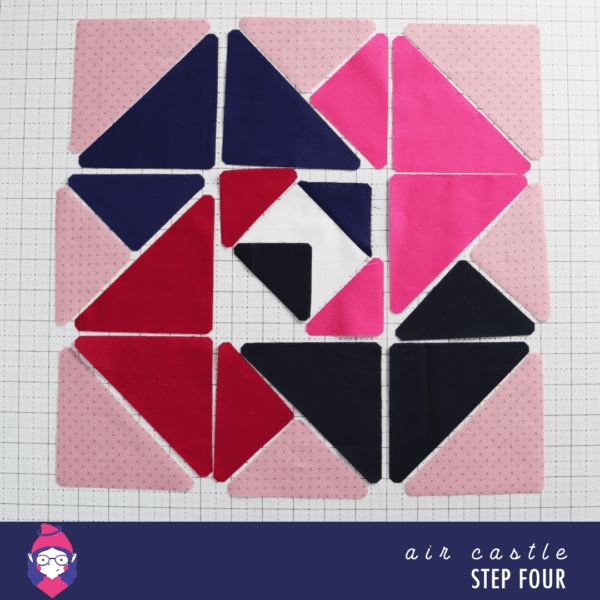
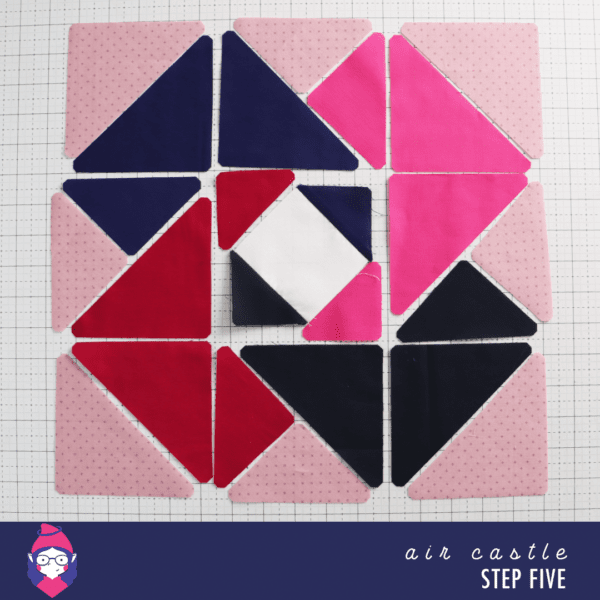
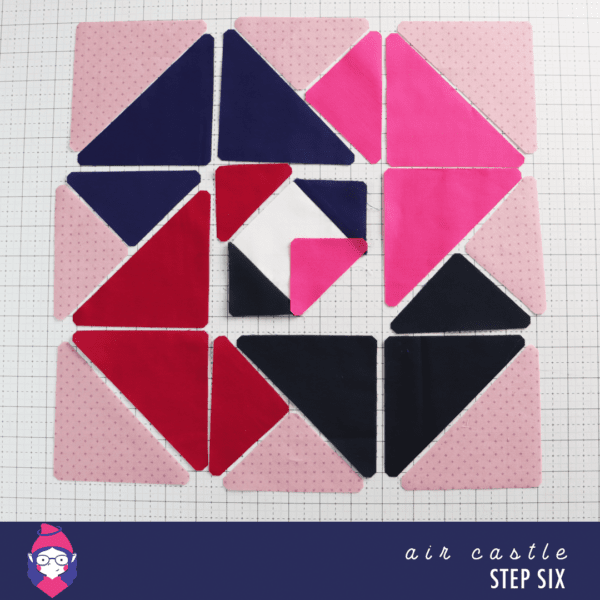
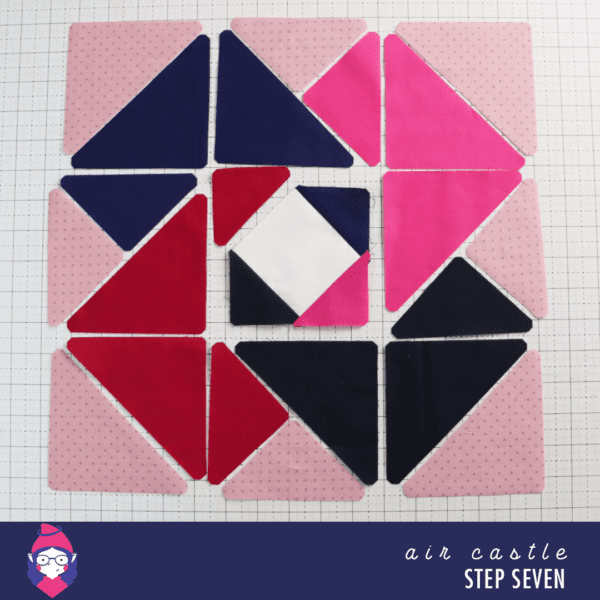
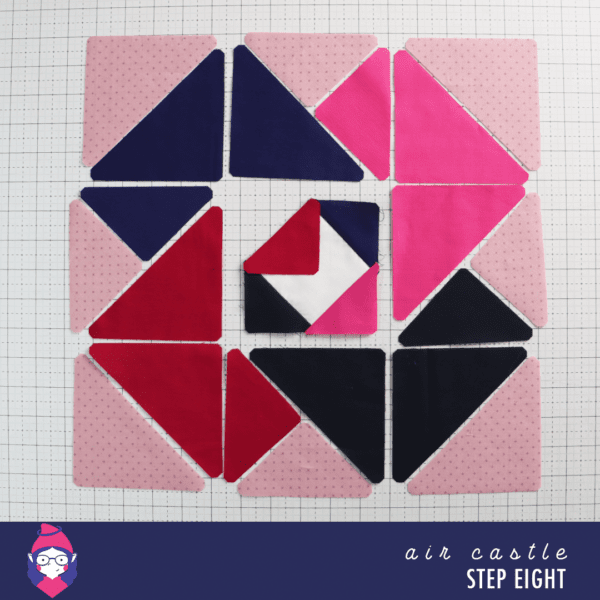
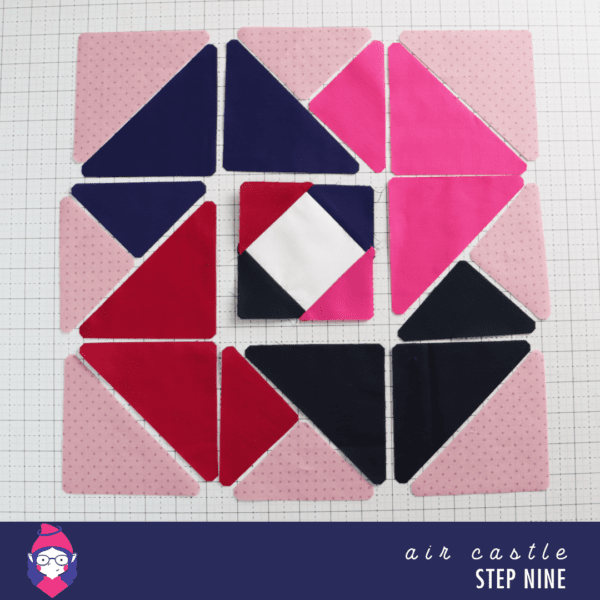
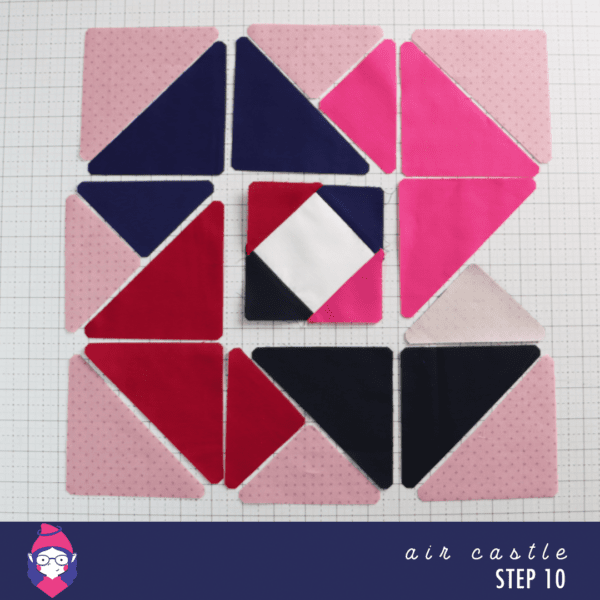
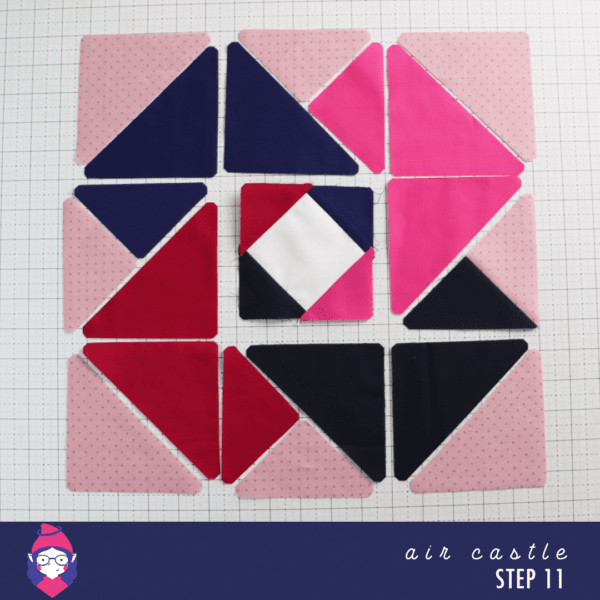
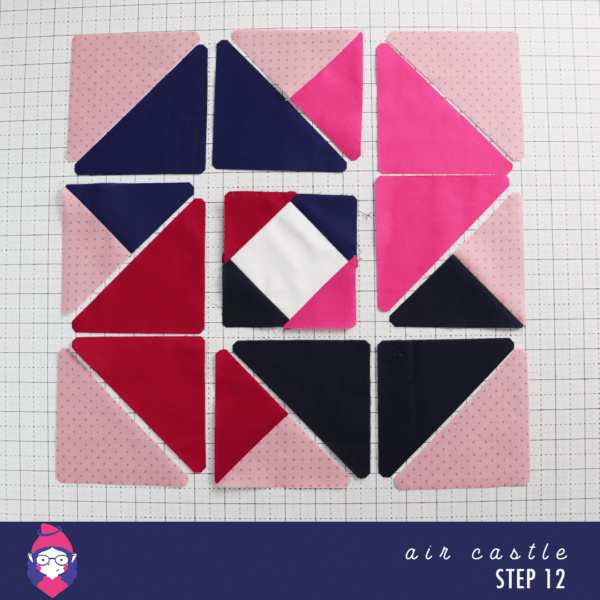
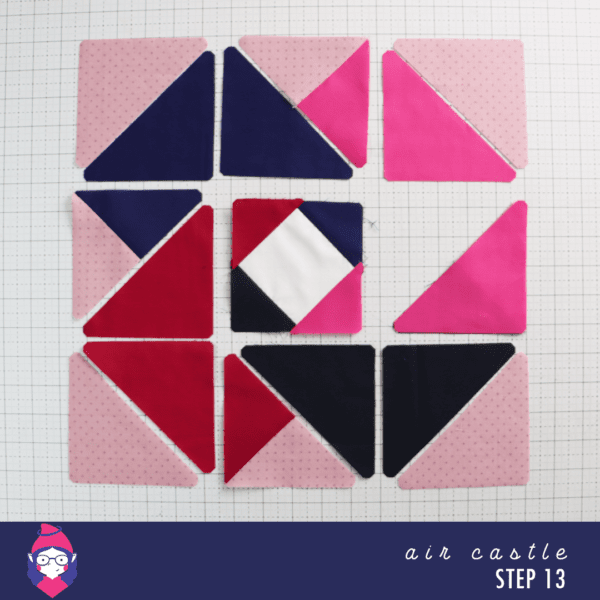
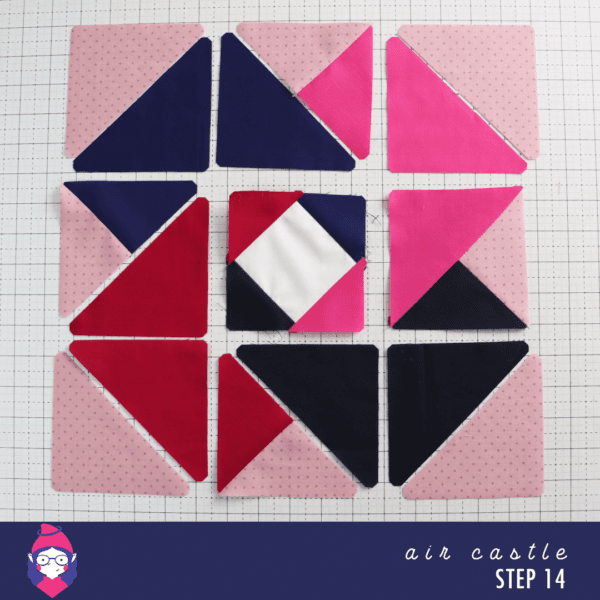
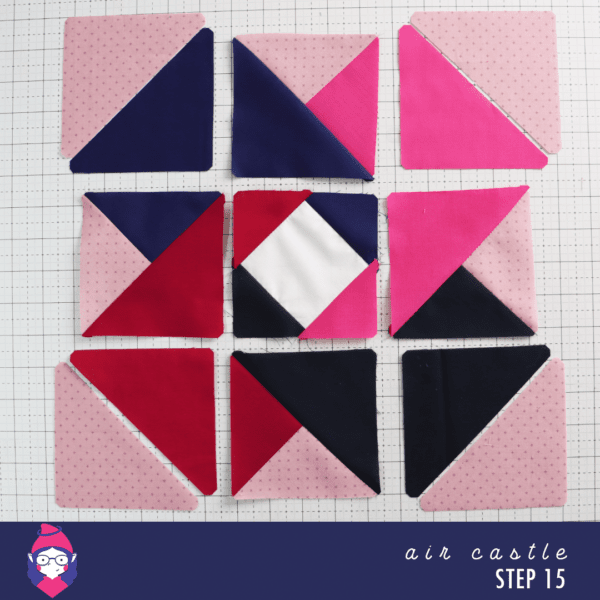
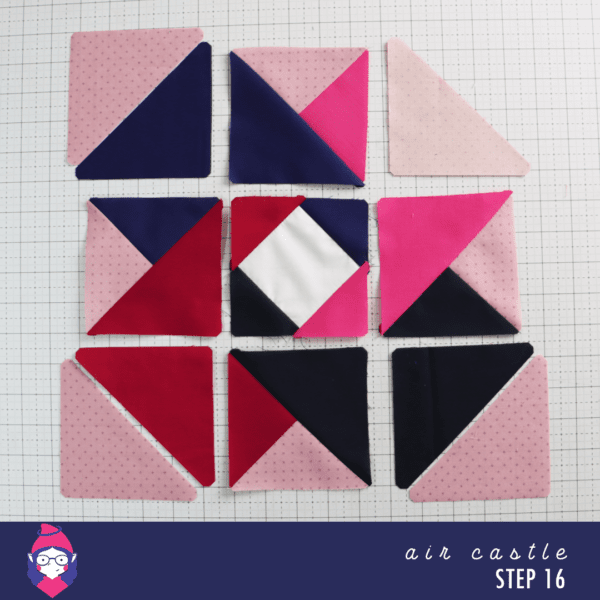
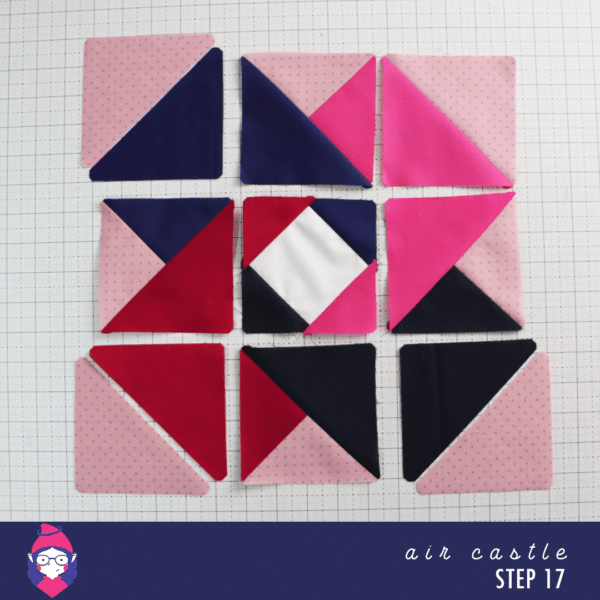
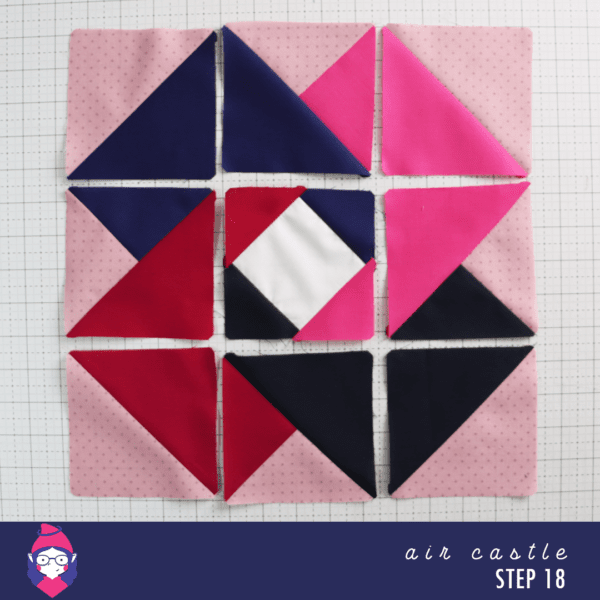
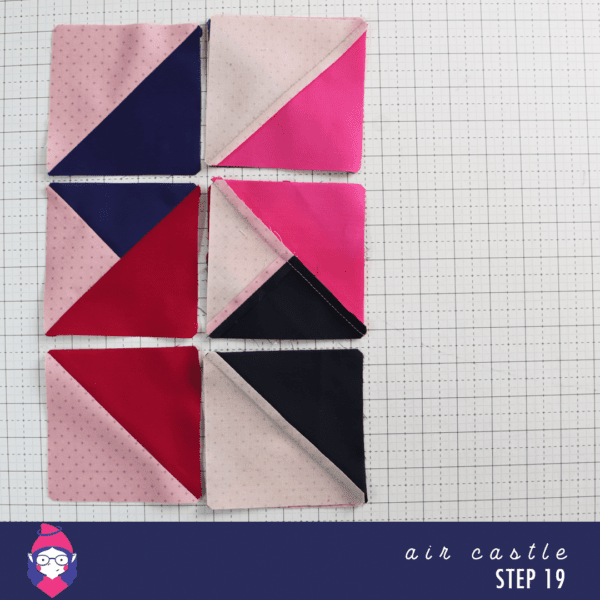
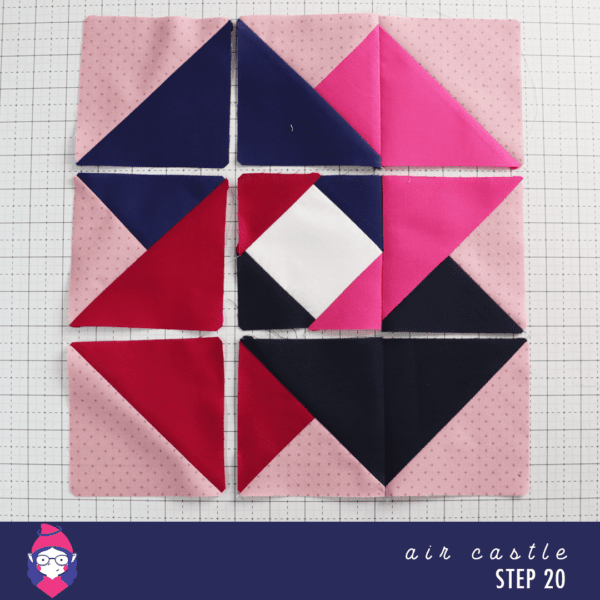
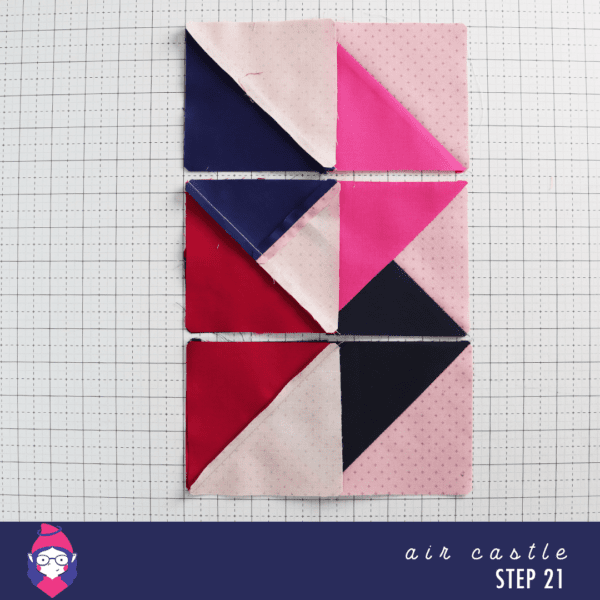
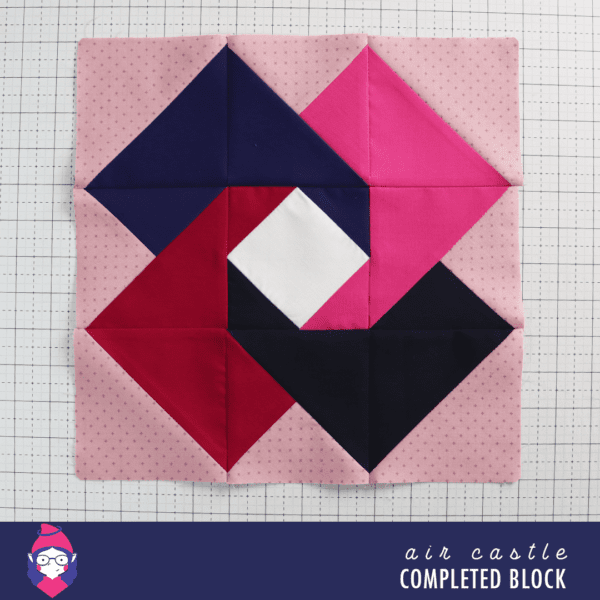
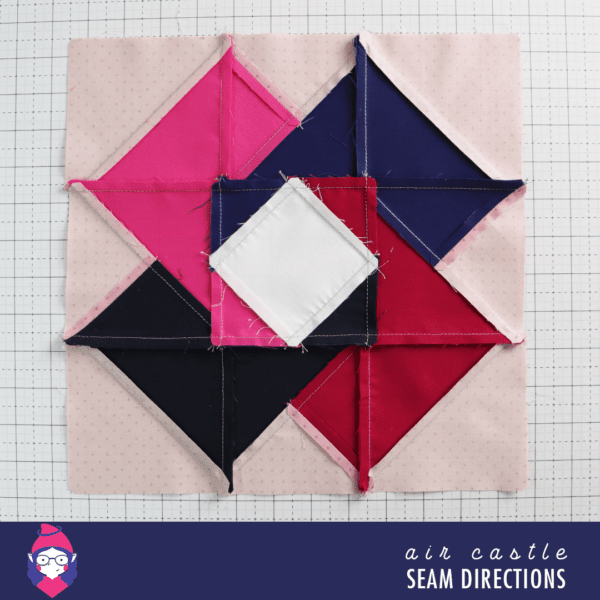
Block Assembly Steps
1: Square in a Square Unit
Use the From Marti Michell Perfect Patchwork Templates to cut all the block pieces. [Please see tutorial picture “Step One” for the pieces laid out.]
Refer to your copy of the pattern for which templates to use for each piece.
- Attach Piece B to Piece A as per Step Two and Step Three. Press.
- Attach Piece H to Piece AB as per Step Four and Step Five. Press.
- Attach Piece E to Piece ABH as per Step Six and Step Seven. Press.
- Attach Piece L to Piece ABHE as per Step Eight and Step Nine. Press.
FYI: I pressed my pieces away from Piece A.
2: Split Half Square Triangle Unit
Use the From Marti Michell Perfect Patchwork Templates to cut all the block pieces. [Please see tutorial picture “Step One” for the pieces laid out.]
Refer to your copy of the pattern for which templates to use for each piece.
- Attach Piece P to Piece K as per Step 10 and Step 11. Press.
- Repeat with pieces: P + G, P + D and P + N as per Step 12. Press
- Attach Piece F to Piece K + P as per Step 13 and Step 14. Press.
- Repeat with pieces: C + PG, M + PD and J + PN as per Step 12. Press
FYI: I pressed my seams open on the split triangles (eg. Piece P + Piece K). I pressed towards the solid (eg. Piece F) when completing the unit.
3: Half Square Triangle Unit
Use the From Marti Michell Perfect Patchwork Templates to cut all the block pieces. [Please see tutorial picture “Step One” for the pieces laid out.]
Refer to your copy of the pattern for which templates to use for each piece.
- Attach Piece O to Piece F as per Step 16 and Step 17. Press.
- Repeat with pieces: 0 + C, O + M and O + J as per Step 18. Press.
FYI: I pressed away from Piece O. However, if you’d like to nest your seams, press towards Piece O.
4: Complete the Block
The block requires:
- 1 – Square in a Square Unit
- 4 – Half Square Triangle Units
- 4 – Split Half Square Triangle Units
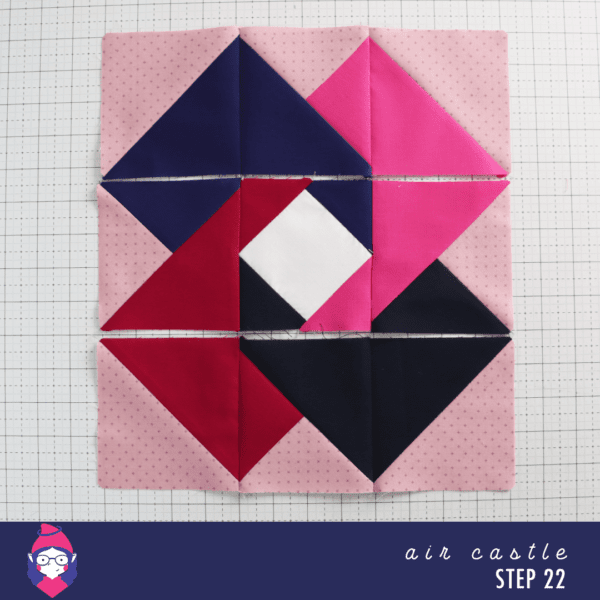
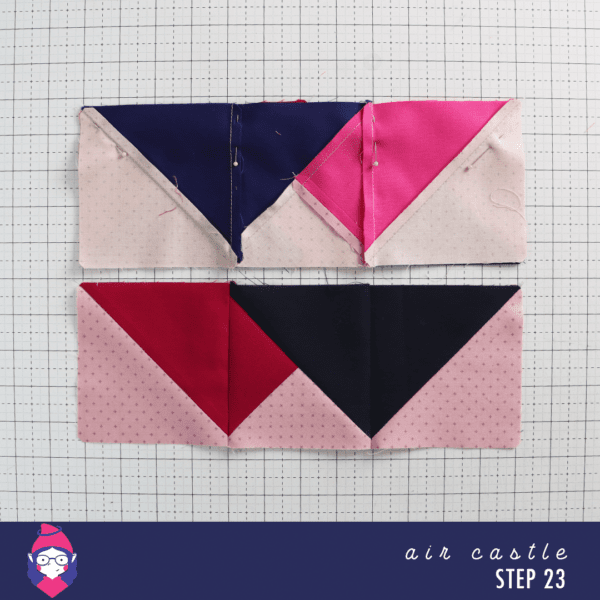
- Join units to make rows. Press.
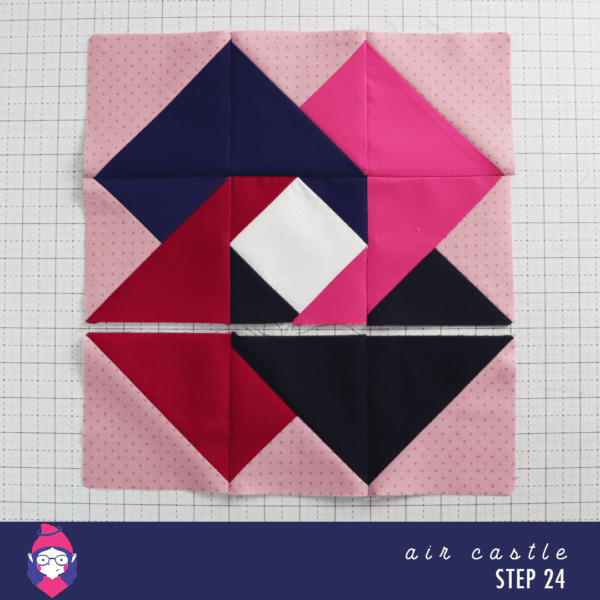
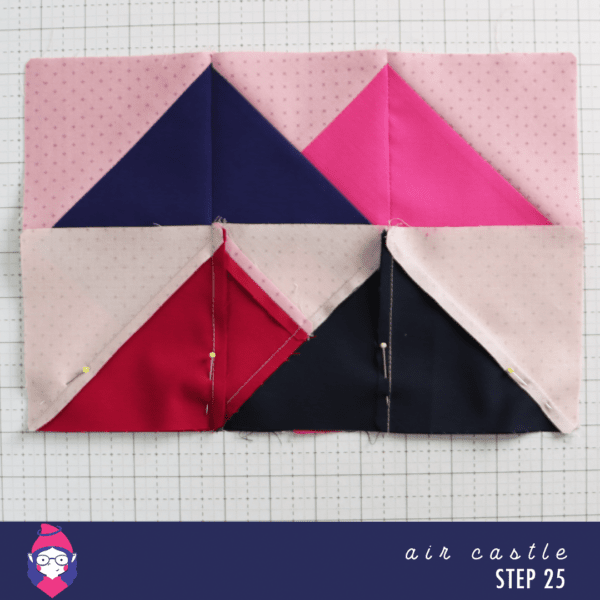
- Join Rows to complete block. Press.
FYI: I pressed the top and bottom rows towards the middle unit of the row. I pressed the middle row away from the middle unit of the row. This is so I could nest the seams when completing the block.
looking for sewing friends?
Got a Question?
If there’s something you’d like further details about the information covered in this blog post simply drop me an email via my contact page and we’ll get it sorted together.